Behringer Xenyx 802 Mods
Behringer Xenyx 802 mixer
The 802 audio mixer from Behringer is a basic and compact unit designed primarily for home/hobby use. While all the basic needed features are included, it does lack some of the extras found on larger mixers. A really useful function of any mixer is the ability to send the audio signal out of the mixer to an effects unit and then have the signal return to the mixer for level adjustment.
 There are two versions of this send/return system, firstly, the “AUX Send” or AUX, and secondly, the FX Send. The Aux version may also be called an insert channel. What’s the difference? The Aux is normally exited from the mixer pre-fader, meaning the level of the channel fader makes no difference to the signal level sent to the external unit. While the FX is normally post fader, typically used for reverb effects etc and the output level is controlled by the channel fader so the effect level tracks with the signal level.
The Xenyx 802 has the FX sends which makes it ideal for use with effects units etc, however, in the shack I need to use a noise gate and do some other processing to the mic signal. This means that I need to use an AUX send which the 802 doesn’t have.
Fear not, it is possible to make some small mods to the mixer and convert the FX sends to AUX sends.
Converting Post fade sends to pre fade sends
The modification is quite simple and requires just some patience, time and reasonably good soldering skills. Please note, the PCB uses SMD components and some fine PCB tracks, if you don’t feel confident carrying out this mod, then find someone competent. I take absolutely no responsibility for any injury or damage caused by attempting any modifications to your equipment.
First of all grab a copy of the Behringer Xenyx 802 Schematic Here – this is labelled as the UB802 mixer on the document but they appear to be identical. Page 1 of the schematic depicts the two microphone channels which, apart from component numbering, are identical in design and physical layout on the PCB.  From the schematic it can be seen that the signal for the FX send is taken at the junction of the PAN (balance) control and the DC blocking capacitor as indicated by the red dot.
 Two options are available for the mod which are: tap the signal path after the EQ section (tone control), marked “A”, or prior to the EQ section, marked “B”. Personally, I chose to tap the signal path after the EQ section.
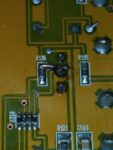
In this photo you can see that the PCB track that goes to R127A has been cut near the bottom left of R116. Cutting the track here effectively isolates the FX send circuit. All that is then required, is for a short wire jumper to be soldered to the “top” end of R116 across to the centre pin of the FX control as seen in the photo. Channel two is exactly the same, except you are looking for R118.
Update
While completing the mod I hadn’t noticed a minor problem. In my normal use, I require the signal to be sent out the FX send, through the outboard processing and back to the mixer through the FX return. The mod works fine in this scenario.
Now the problem, when I wanted to use the “dry” mic signal without any processing, I noticed that when I turned the FX Send control all the way down, the signal through the fader was very attenuated. Looking at the schematic again, I realised I had cut the track from R127A & R128A on the “wrong” side and thus when the FX control was in the ∞ position, it was effectively shorting the signal path to ground.
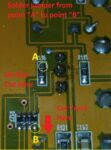
 To resolve the problem, I simply replaced the short wire jumpers with suitable resistors. I had no 5K1 resistors laying around, so I’ve used 4K7 – works with no problems. This image shows where the track cuts should be made and the connection points for the jumpers.
Thanks for this mod detail; most useful. I did this on Chs 1 and 2 on my own unit; I may do the same on the stereo inputs too at some point. As well as this mod, I also moved the Monitor path’s tap to before the Main Level fader, so I could achieve independent adjustment of the Main and Headphones output.
If anyone is trying to do this on a Behringer Xenyx Q802USB, then you’ll quickly discover the PCB is completely different, and the schematic is not the same either.
I decided the best way to mod channel 1 was to remove R93, and use a replacement 5.1K resistor to bridge the middle FX pot pin with the left pin of the through-hole component (probably a cap), below R54. Photo here: https://imgur.com/gallery/pv2LhLI
Hi came across your page and you seem pretty knowledgeable. So I wanted to ask a question and see if you could help. So theres 2 versions one with usb and one without usb. Is there a way to diy update from non-usb to adding ur own usb connection mod/update?? Thanks. Prolly wont get an answer since the post is so old but hey u never know lol. You can email me also if that would be more convenient. Thanks for your time
I really can’t answer your question as I have absolutely no idea. I suppose you could use some form of USB soundcard to use it as a USB device…
Thanks for sharing this! Helped me make this mod without so much investigation. You must have a good camera for the photos! My iPhone 13 doesn’t magnify as well as this. The hardest part of doing this mod was dealing with the very small traces and small solder pad targets, though the solder mask on the board helped.